Category
- Concrete Best Practices
- Joints & Details
 The Krystol Waterstop System is used to permanently waterproof concrete construction joints. It is installed in place of other less reliable joint systems and allows for flexible scheduling and easy inspection. The Krystol Waterstop System uses Krystol crystalline technology which reacts with water and un-hydrated cement particles to grow insoluble needle-shaped crystals that fill capillaries, microcracks and pores of the concrete to reduce permeability and stop the water.
The following application instructions are used to waterproof horizontal and vertical construction joints in high-risk locations using the Triple Protection Method, which is composed of Krystol Waterstop Grout, Krystol Waterstop Treatment, Krytonite Swelling Waterstop and Krytonite Adhesive.
For a quick overview of the Krystol Waterstop System see the video instructions below.
LIMITATIONS
Krystol Waterstop System is effective for rigid structures only and may not reliably seal joints that experience variable loading or repeated the movement. Consult a Kryton representative for project specific recommendations. Use typical cold weather practices if applying in cold climatic conditions. Installation during heavy rain must be avoided.
SAFETY PRECAUTIONS
Read and follow the Safety Data Sheets (SDS) for these products. For professional use only. These products become highly caustic when mixed with water or perspiration. Avoid contact with skin or eyes. Avoid breathing dust. Wear long sleeves, safety goggles and impervious gloves.
STEP 1: SURFACE PREPARATION
 Concrete/Shotcrete surfaces to receive the Krystol Waterstop System must be sound, clean and free of dirt, oil, and other elements which may interfere with bonding. Use a chipping hammer or scrabbler to remove loose aggregate and level rough or uneven joints.
TIP: Removing loose or protruding concrete and aggregate, and cleaning debris or overspray while concrete/shotcrete is in a plastic state will minimize the need to do after it is in a hardened state.- Prepare joints by high-pressure water blasting to remove any form oils, curing compounds, dust or other contaminants. The topmost surface of cement paste should be removed; some exposed aggregate is ideal.
- Surfaces to receive the Krystol Waterstop System must be brought to a saturated,
surface-dry (SSD) condition. This means that the pores of the concrete are completely saturated with water but no free water remains at the surface. Thoroughly pre-soak the surface with water then remove excess water with a sponge immediately before application.
TIP: High-pressure water blasting is effective at cleaning and saturating the joint in one step.
 Concrete/Shotcrete surfaces to receive the
 STEP 2: APPLY KRYSTOL WATERSTOP TREATMENT
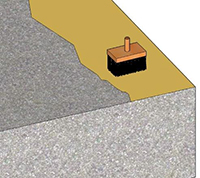
- Bring concrete to a saturated surface-dry (SSD) condition. This means that the pores of the concrete are completely saturated with water but no free water remains at the surface. Thoroughly pre-soak the surface with water; then remove excess water with a sponge just before applying Krystol Waterstop Treatment.
- Mix Krystol Waterstop Treatment to a thick but free-flowing paste (approximately 3 parts powder to 1 part clean water by volume). The paste will seem thick at first but will become thinner with mixing. Mix only as much material as can be placed in 30 minutes.
NOTE: Material left standing will quickly stiffen, but mixing will restore plasticity. Do not add water to the material once it has started to set. Over-watering will result in shrinkage cracking. - Coat the entire surface area of the joint with Krystol Waterstop Treatment using a concrete brush at a spread rate of 1 kg/m2 (0.2 lb. /sq. ft.), which will be at least 1 mm (40 mil). Employ a circular, scrubbing motion to achieve maximum penetration and adhesion. Do not allow Krystol Waterstop Treatment to build up on nearby reinforcement.
- Protect the Krystol Waterstop Treatment application from damage by rain, rapid drying or freezing for 24 hours or until concrete/shotcrete is placed over it. Typical hardening time of Krystol Waterstop Treatment is 2.5 hours at 20°C.
NOTE: For shotcrete placed the same day, the subsequent layer of shotcrete must be placed while the Krystol Waterstop Treatment is still plastic (within 60 minutes under most conditions).
IMPORTANT: Krystol products must be protected from rapid drying and kept damp to develop their full properties. Cover the Krystol Waterstop Treatment with plastic sheeting or damp burlap to contain moisture. After the treatment has hardened, mist the surface with water to maintain moisture levels for 24 hours. Do not use curing compounds.
 Bring concrete to a saturated surface-dry (SSD) condition. This means that the pores of the concrete are completely saturated with water but no free water remains at the surface. Thoroughly pre-soak the surface with water; then remove excess water with a sponge just before applying
 STEP 3: INSTALL KRYTONITE SWELLING WATERSTOP
Only install Krytonite Swelling Waterstop after Krystol Waterstop Treatment is in a hardened state. Installation of Krytonite before Krystol Waterstop Treatment has hardened can result in failure. Install in dry conditions only; contact with water can result in premature swelling of the strip, which must be avoided.
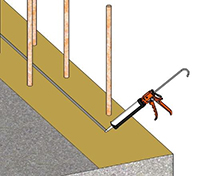
 At a coverage rate of 8-10 meters (26-32 feet) per tube, apply a 6 mm (1/4 in.) thick bead of Krytonite Adhesive along the center of construction joint where Krytonite is to be installed. There must be enough adhesive that when Krytonite is pressed into the adhesive it squeezes out from the sides. Rough surfaces will require more adhesive.
IMPORTANT: Krytonite needs to be placed at, or near, the center of the construction joint.- Must have a minimum of 75 mm (3 in.) of concrete cover. Do not place within 75mm (3 inches) of the edge of the construction joint. Installation too close to the outside edge of the concrete may result in damage to the concrete if immediate swelling should occur.
- Leave a space between Krytonite and rebar of at least 25 mm (1 in.) to prevent void spaces.
- Krytonite is NOT for use at expansion joints. Use Krytonite at construction joints, around penetrations, between precast elements and other places where concrete joints occur.
- Immediately press the Krytonite Swelling Waterstop into the adhesive, unrolling the coil as you progress. Do not allow time for the adhesive to form a skin. If adhesive is not available or if an additional hold is needed, nails can be used to secure the waterstop and spaced a maximum of 3 nails per meter (approx. 1 nail per foot).
- Cut Krytonite to length using scissors. Ends should be tightly and squarely butted and not overlapped. Mitre corners by cutting both strips at an angle.
- Allow adhesive to cure before pouring concrete.
IMPORTANT: Contact with water will result in premature swelling of the strip. Protect the installed Krytonite from water until the concrete is poured. If premature swelling occurs,
dry the Krytonite sufficiently to restore its original dimensions and ensure material is properly affixed to the surface before pouring concrete.
 At a coverage rate of 8-10 meters (26-32 feet) per tube, apply a 6 mm (1/4 in.) thick bead of Krytonite Adhesive along the center of construction joint where Krytonite is to be installed. There must be enough adhesive that when Krytonite is pressed into the adhesive it squeezes out from the sides. Rough surfaces will require more adhesive.
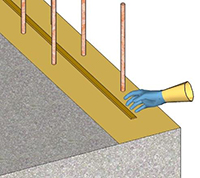 Immediately press the Krytonite Swelling Waterstop into the adhesive, unrolling the coil as you progress. Do not allow time for the adhesive to form a skin. If adhesive is not available or if an additional hold is needed, nails can be used to secure the waterstop and spaced a maximum of 3 nails per meter (approx. 1 nail per foot).
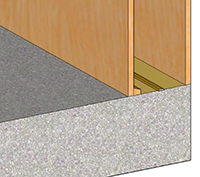
STEP 4: CREATE A KEYWAY
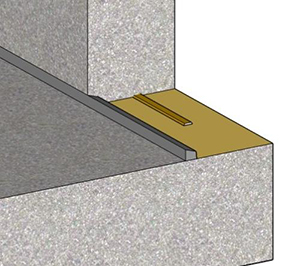
- Create a keyway at the intersection where the two concrete sections will meet. A suitable keyway can be formed from a dressed 2×2 by trimming one edge off at an angle to leave a narrow edge of about 1.25 in. (40 mm x 40 mm tapering to 30 mm).
- Attach the keyway form to the edge of the concrete form with the narrow end facing inwards. For slab-to-slab joints, the keyway can be pressed into the joint while the concrete is still plastic.
NOTE: Shotcrete applications require keyways to be formed during the Shotcrete application by one of the following methods:
a) Pressing it into the semi-plastic shotcrete, or
b) Tacking on a form before the subsequent layer of shotcrete is placed and removing the form to produce the keyway, or
c) Using a trowel while the shotcrete is still semi-plastic to dig out a keyway of the proper dimensions.
 Create a keyway at the intersection where the two concrete sections will meet. A suitable keyway can be formed from a dressed 2×2 by trimming one edge off at an angle to leave a narrow edge of about 1.25 in. (40 mm x 40 mm tapering to 30 mm).
STEP 5: PLACE AND CONSOLIDATE CONCRETE
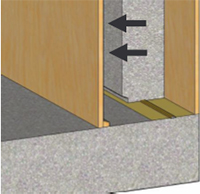
Take care not to dislodge the Krytonite during concrete placement. Do not drop concrete from a great height. If placement is by shotcrete method, avoid shooting at the side of the Krytonite strip. Place concrete over the joint using normal concrete practices, ensuring:
- Debris is removed from the joint prior to placing concrete.
- Form release oil does not contaminate the joint area.
- Form spreaders are removed as concrete is placed.
- Consolidation of concrete around the joint, which requires careful concrete placement and vibration, follow the procedures in ACI 309R (Guide for Consolidation of Concrete)
- Concrete forms are left on as long as possible.
- Shotcrete applications are placed by ACI certified nozzlemen following procedures in accordance with ACI 506R – Guide to Shotcrete.
- Curing is in accordance with ACI 308.1 and that proper measures are taken to prevent rapid drying.
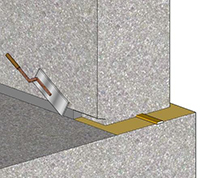
STEP 6: PREPARE THE KEYWAY
- Remove keyway forms from the set concrete or shotcrete. Take special care to ensure that no wood is left in the keyway.
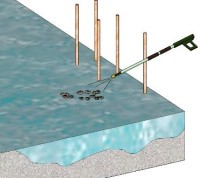
- Ensure keyway is clean and free of dirt, oil, and other elements which may interfere with bonding. Joints should be prepared by high-pressure water blasting to remove any form oils, curing compounds, dust or other contaminants.
- Surfaces to receive the Krystol Waterstop Grout must be brought to a saturated, surface-dry (SSD) condition. This means that the pores of the concrete are completely saturated with water but no free water remains at the surface. Thoroughly pre-soak the surface with water then remove excess water with a sponge immediately before application.
TIP: High-pressure water blasting is effective at cleaning and saturating the joint in one step.
 Remove keyway forms from the set concrete or shotcrete. Take special care to ensure that no wood is left in the keyway.
STEP 7: INSTALL KRYSTOL WATERSTOP GROUT
Only proceed if the keyway is NOT leaking water. If water is leaking through the keyway, stop flowing water with Krystol Plug before installing Krystol Waterstop Grout.
- Krystol Waterstop Grout may be installed at any time, but for best results wait for concrete/shotcrete drying shrinkage to take place first.
- Ensure that the concrete keyway is clean. Remove any form release agents, dirt or debris using mechanical abrasion and/or water blasting.
- Bring concrete keyway to a saturated, surface-dry (SSD) condition. This means that the pores of the concrete are completely saturated with water but no free water remains at the surface. Thoroughly pre-soak the surface with water; then remove excess water with a sponge just before applying Krystol Waterstop Grout.
Mix Krystol Waterstop Grout to a stiff putty consistency. Start by mixing 3.5 parts powder with 1 part clean water by volume until smooth. Add an additional part of powder (for a total of approximately 4.5 to 1) and continue mixing to obtain a sag-free paste. The mixture will appear dry at first, but with mixing will become smooth and workable. - Mix only as much material as can be placed in 30 minutes. NOTE: Material left standing will quickly stiffen, but mixing will restore plasticity. Do not add water to the material once it has started to set. Over-watering will result in shrinkage cracking.
IMPORTANT: Above mix ratio is approximate and intended only as a guide. Conditions may vary affecting the actual powder to water required. Adjust the powder and water content accordingly in order to obtain a consistency that is plastic, sag-free and stiff enough to be formed into a ball and hold its shape. - Tightly pack the Krystol Waterstop Grout into the keyway so that it is flush with the surface.
- Protect the Krystol Waterstop Grout application from damage by rain, rapid drying or freezing for at least 24 hours.
IMPORTANT: Krystol products must be protected from rapid drying and kept damp to develop their full properties. Cover the Krystol Waterstop Grout with plastic sheeting or damp burlap to contain moisture. After the grout has hardened, mist the surface with water to maintain moisture levels for 48 hours.
 Krystol Waterstop Grout may be installed at any time, but for best results wait for concrete/shotcrete drying shrinkage to take place first.
MATERIALS AND COVERAGE
| Material | Coverage |
| Krytonite Adhesive | Approximately 8- 10 m (26-32 ft) per tube |
| Krytonite Swelling Waterstop | 50 m (164 ft.) per/box; 5 rolls @ 10 m (33 ft.) per/roll |
| Krystol Waterstop Treatment | Approximately 80 m per 25 kg pail @ 30 cm wide (225 ft per 55 lb. pail @ 12 in. wide) |
| Krystol Waterstop Grout | Approximately 7.5 m per 25 kg pail (25 ft per 55 lb. pail) |
TOOLS
- Clean water supply
- Mixing bucket, drill and mortar paddle
- Natural bristle concrete brush
- Water spray and towel/sponge
- Margin Trowel
- High-pressure water blaster
- Measuring cups
- Keyway form
- Caulking gun